
Roxio CD Mastering Example.
Here is the procedure for creating the Emergency System Backup CD Using Adaptec Easy CD Creator version 5.
Preparing the Backup.
- Insert a blank CD-R (Not CD-RW) into your CD writer drive.
- If the integrated AISBackup CD Writer is active AISBackup will detect the capacity of a blank CD in this case click OK, if not choose or enter (in megabytes) the capacity from Blank Capacity and click Use This Capacity.
- AISBackup will now split the backup into CD sized folders based on the capacity of the blank CD. Do not use smaller CD's for the second, third CD etc.
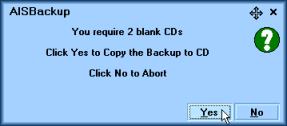
- Click Yes to create the CDs.
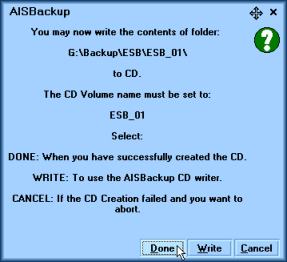
- Read the next prompt for instructions on how to create the first/next CD. If the AISBackup CD Writer has been activated then you may choose to use it instead of a third party CD Writer by clicking Write. Do not click Done until the CD has been created....
Mastering The CD.
- If your PC can boot from a CD you may choose to create a bootable CD, for this you will either have created the AISBackup enhanced Windows Emergency Restore Diskette (start-up diskette) or you will need the physical 3�" Windows Emergency Restore Diskette (start-up diskette), that was created here.

- If you are not creating a bootable CD click here.
- Select the menu option File / New CD Layout / Bootable CD. The following prompt will be displayed:

- If you have added then AISBackup menu items to the Windows start-up diskette (see here) AISBackup will have created a boot image file in the AISBackup/Database/Bootimage folder, select Use Existing Image file then click Browse to locate and use this boot image file.
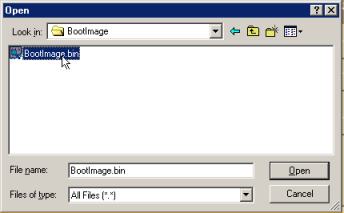
- Locate and Open the boot image file as shown above.
- Locate the backup directory that was created when you ran the Emergency System Backup. If you have forgotten what this is you may look at the Job tab on the main form.
- Open the first CD folder, in this example it is called ESB_01.
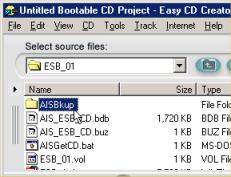
- Select all files in this folder by using the menu option Edit / Select All.
- Add these files to the CD by using the menu option Edit / Add to CD Project.
-
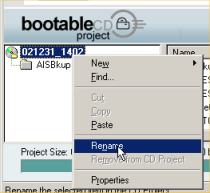
Change the name of the CD to that requested in the AISBackup prompt, in this example the first CD is called ESB_01. (If you forget this step the restore will still work).

- The form should look something like above, click Record or the menu option File / Record CD.
- Click the Create CD button, the following form is displayed:

- Select the Write speed appropriate to the CD inserted, ensure that Finalize CD is selected then click Start Recording.

-
Wait for the CD to be created and acknowledge
all the prompts. Do not save the CD project because the files are going to
be moved back to the proper AISBackup folder.
Go back to the AISBackup Create CD prompt and click Done. AISBackup will now test that the files can be restored from the CD. - Repeat this process for the second, third etc CD.
Checking the CD is bootable and readable from DOS.
You may now want to check that you can boot from this CD (if it was created bootable), and / or the files will be accessible from DOS. To see if your PC can be booted from a CD see your mother board instructions, alternatively, check the CMOS settings:- While re-booting enter CMOS settings (on some PC's press the DEL key when prompted)
- Check the BIOS Features Setup (refer to your PC manual) for the Boot Sequence, if present select CDROM,C,A This means boot from in order of CD, C Drive then A drive. If there is no bootable CD in the CD drive the PC will boot from the C drive. If you want to be able to boot from the A drive in preference to the C drive, you will have to change the boot order back to A,C.
- If booting from the CD the PC will boot into a logical A: drive, this only contains the image of the Windows Recovery Diskette. Choose Start the PC with CD ROM Support from the DOS menu, this will now continue to load your system to DOS. Note the drive letter of the CD-ROM. It may seem strange, but your CD-ROM is now split between an A: drive and, say, a J: drive. The J: drive, in this example, contains the files necessary for restoring Windows to your PC.
- If you have booted from the Windows Recovery Diskette, select the menu option Start the PC with CD ROM Support. Make a note of the CD-ROM drive letter.
- Check that you can read the contents of the CD ROM. The following example assumes that the CD has been given a drive letter of J:. Type the following commands.
-
 Indicates type a space here.
- CD
- DIR <ENTER> this should show the list of files on the CD.
- If you have some spare space on a hard drive you can further test the CD-ROM by copying the files from it to the hard drive. This process will take a long time if you do not load smatrdrv.exe!
- A:\smartdrv <ENTER>
- (Assuming the spare space is on the D: drive) D: <ENTER>
- MD
- CD
- Windows 95, 98: COPY
- Windows 95, 98: MD
- Windows 95, 98: CD
- Windows 95, 98: COPY
- Windows ME: XCOPY
- Remember to delete D:\DELETEME when you next re-start Windo
This concludes the creation of the Emergency Backup CD.
If you are following the scenario Securing The C Drive click here.